We all know how delicious microgreens can be. Luckily you can grow them yourself at home without needing to constantly buy garnish from the store. Since microgreens, by definition, do not take very long to grow, there are a few easy methods of maturing them. The two most common ways to grow microgreens are either in soil or hydroponics.
Should You Grow Microgreens in Soil or in Hydroponics? For those of you first starting out, it is a much better idea to grow microgreens in soil. Hydroponics should be left for those familiar with the practice or just looking for a different growing method.
Keep reading for a better understanding of both the soil and hydroponic growing methods (in addition to a few alternatives), so you can make a successful and delicious microgreen harvest.
How to Grow Microgreens in Soil
Hydroponic growing, in any form, is relatively new, especially compared to the history of human agriculture. While it ends up being more efficient once you know what you are doing, soil growing comes much more naturally to you and me. Therefore, you should definitely do at least a few soils grow before switching over if you so choose.
Although you are doing it inside, soil microgreen growing on a base level is not too much different from the garden growing. If you are already familiar with that process, you will certainly have even more of a leg up on this relatively easy method. Let's walk through the soil growing method:
- Buy the right materials
- Mix
- Add the seeds
- Mist and cover
- Bring in sunlight later
- Wait
- Harvest
Buy the Materials You Will Need
Before growing anything, you will first need to buy all your necessary materials. Luckily, since the soil method is not too complicated, you will only need:
- Soil
- Growing mixture
- Seeds
- Trays
- Water
- Sunlight
Soil is, of course, the most important part of the soil growing method, so you will want to make sure it is of the utmost quality. Brands like Happy Frog or Miracle-Gro are typically your best bet, as they are both a nice and thick, hearty soil for your microgreens.
At the same time, as you might have just seen, these soils can become expensive, really fast. If you are growing for your own family meals, that might not be much of an issue. But if you plan on selling to restaurants, you could certainly end up feeling the pinch.
Luckily, microgreens are harvested rather quickly, before their roots expand really far out into the soil. Therefore, a great way to sustain your soil is to mix it with a growing mixture like this one from CocoTek. Materials like these are a lot cheaper than soil and can save you some money while not forcing you to switch over to hydroponics.
After that, you need to settle in on what you want to grow. Microgreens include many edible plants that grow really fast. Feel free to mix it up and experiment! Just make sure you isolate one microgreen per tray. Here are the best ones to consider and the best seeds to make them happen:
As far as the carrots go, you may be surprised that the microgreen version of them is even tastier than the full size. There are plenty more microgreens out there, so try them all!
Trays are obvious, but a little more on water and sunlight: you will not need water the whole time since this is not the hydroponic method, but you will still need some. Tap water is not worth the risk; use filtered water instead.
You will not need sunlight the whole time either, but do the best you can when you do need it. If you live in an apartment or somewhere else small without a lot of daylight, this growing lamp should do the trick.
Source: GroCycle
Mixing
Once you have all your supplies, the next step is to mix them properly. That should happen in a certain order:
- First, put just the growing mixture in a large container, leaving plenty of extra space. Add water, but not until saturation. Just enough to make the mixture damp. Move it around, so there are not any clumps.
- Mix the soil and growing mixture: You can do this roughly at a 50/50 combination in the large container.
- Once the mixture is uniform, pour it out into your trays, so it sits perfectly flat (use a knife if you have to), and you are ready for the next step in the process.
Seeding
The next step is to actually add the seeds to the soil mixture. You may be surprised at all the different shapes and sizes of the different microgreen seeds: cilantro, for example, is very large and contains most of its own nutrients already.
Since the roots, as little as they will be, need space to grow down into the soil, do not bury the seeds under the surface. Just spread them out on top in a uniform fashion. You can go heavy here, leaving only some gaps for spacing. Think of it as spreading fertilizer over a patch of dirt in the backyard: you want a lot but not an overbearing amount.
Mist and Cover
The next part of the soil growing process is watering. Fill up any mister you have at home (otherwise, this one will do just fine). Spray the microgreen seedlings 10-12 times, so they are nice and damp. By misting, you are further enhancing the surrounding soil as well.
Now take an empty tray and spray the inside of that 4 or 5 times as well. Then set that tray upside down over the soil and seed-filled one. In this first stage of soil growing, humidity is more important than light. Now place the tray in a room temperature (65 to 75-degree Fahrenheit) location.
Check on it every 12 hours and spray more as needed. Repeat for 4 or 5 days or until one day after the baby leaves first begin to form.
Sunlight
Your crop needs darkness first so it can struggle, as that helps produce a heartier (and tastier) microgreen. Once those leaves come out, though, it is time to give it some sunlight. After all, what use is a microgreen that dies in the middle of a grow? Take off the top tray and put it somewhere bright and sunny where bugs will not get to it, such as:
- In a large window
- On a balcony
- On the edge of a porch
The window option is great since it will not be outside, exposed to bugs and the elements. Of course, bugs and other critters could find your microgreens outside, so make sure you check up on them often. Move them somewhere safe if you have to. Keeping them off the ground is always your best bet, like on a table or chair.
As mentioned earlier, these choices might not be realistic for some of you. If you decide to order a grow light instead, make sure you follow any directions. These lights become much hotter than an average house light bulb, so you need to make sure you install them safely. Place microgreens a few feet away, directly underneath.
Wait and Check
Now is the waiting game. For the next ten days, you will need to sporadically check on your microgreens as they grow. Every 12 hours should do it. Moisten as needed but do not overdo it.
Harvest
Lastly, it is time to harvest your crop. Typically this will happen ten days after you start, but again, it depends on the individual crop. Some are done in 7 days; others might take as long as 17 days. But that is still nothing compared to large garden plants.
To harvest your microgreens, pull them carefully and completely out of the soil. This will not be too challenging to do since the roots are not very long. Still, be careful not to rip off the roots. Otherwise, reusing the soil mixture later becomes more difficult.
Additionally, make sure you harvest at night or when the temperature and humidity outside is cool and dry. Immediate exposure to heat can kill the microgreen way quicker than you can eat it. Dryness after harvest means a fresh and crispy taste.
Sources:
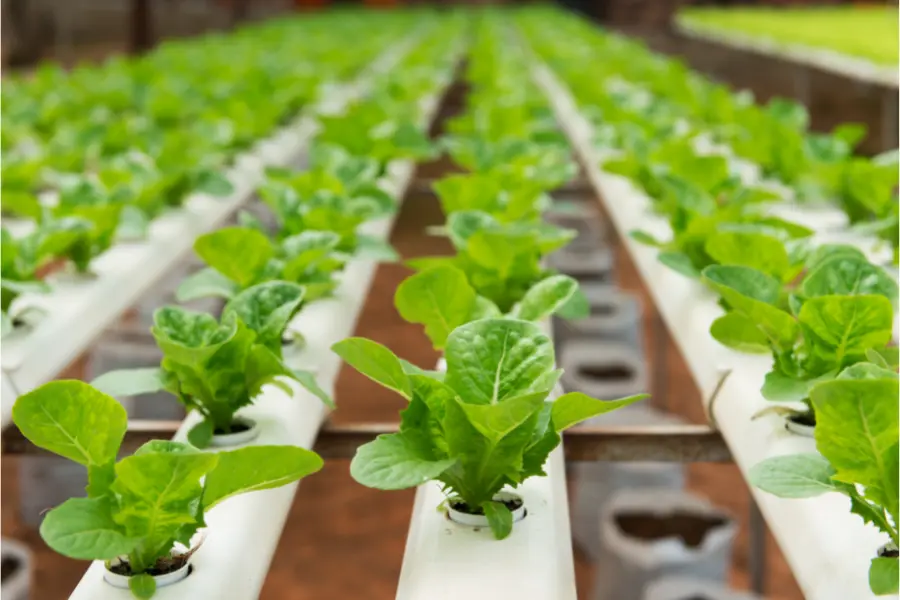
How to Grow Microgreens in Hydroponics
If growing in soil is so easy, why bother using hydroponics? It is a fair question. However, there are a few distinct reasons why you may want to choose hydroponics for growing your microgreens instead:
- You are already familiar with hydroponics
- All that soil, even with the growing mixture, is becoming really expensive
- Hydroponics is more environmentally sustainable
Not having to use soil is certainly good if you are planning on growing microgreens in large quantities, like if you are selling to restaurants or farmers' markets. Here cutting that out of your margins can make a huge difference.
Also, soil can be reused, but not more than a couple of times. That means you are constantly throwing out the old soil and buying new soil, which is not great for the planet.
To make a final determination on which microgreen growing method is right for you, you need to know how involved it is. Here is how you would use hydroponics to grow microgreens if that is what you would decide:
- Buy all necessary materials
- Prepare your growth tub
- Mix in Aqua Flakes
- Adjust the pH until it is just right
- Add an air stone
- Set up the cups
- Continue the rest of the way just like the soil method
Buy the Materials You Will Need
If you are just starting out with hydroponic microgreen growing, you will need to pick up some additional supplies. While you will no longer need soil, you still need:
- Large tubs
- Seeds
- Growing lamps (if you do not have good sunlight)
You will definitely need water this time too. Lots of it, so make sure you have a water filter at the ready.
Additional supplies you might need are:
- Aqua Flakes A
- Aqua Flakes B
- pH meter
- pH up and down solution
- Air pump
- Airstone
- Tubing
- Plastic open-air cups, 3 inches wide
- TDS Meter
Unlike microgreen growing with soil, where the rules on water essentially boiled down to "Make sure it is clean," hydroponic growing implies that the water needs to be absolutely perfect for a successful grow. This is where solutions giving you the exact pH level, along with a meter, help out a great deal.
If you have done hydroponic growing before, you will probably already have a lot of these materials. If not, there are plenty out there. The only things you really cannot be cheap on are the pH up and down solutions along with a quality pH meter.
Prepare Your Tub (or Tubs)
Next is to set up your large tub. This will be used for most of the process, not just mixing ingredients. First, cut holes into the lid of your tub, large enough for the cups to rest in but not fall through. The idea is that you want the cups, which will contain your microgreens, to rest 1 inch over the surface of the water.
Once you have that dimension mapped out, fill up the tub with water until you reach that point. Next, place your cups in the lid holes and then set the lid on top of the lid.
Mixing in Aqua Flakes
The next part is to create the perfect hydroponic water mix. Notice how we have not even begun to talk about the seeds yet; we are actually still somewhat far away from adding them in, unlike the soil method, which uses them almost immediately.
The first ingredients to mix into your water are the Aqua Flakes. If you are using a large, 7-gallon tub, you want to use 49 mL (7 mL per 1 gallon of water) of Aqua Flakes A and 49 mL of Aqua Flakes B. Do not mix them at the same time. Mix the A first until it is completely dissolved. Then go ahead and do the same thing with B.
Adjusting pH
After adding in the Aqua Flakes, you will have just about all the nutrients you need to replace soil. However, microgreens do not naturally grow in water. As a result, you need to take extra care to make sure you have a pH of 6.0. Follow these steps to arrive at the proper pH.
- Measure the pH with your pH meter. If you are already at 6.0, lucky you. Move on to the next part of the process.
- More likely, though, you will be close but a little off. If it is too low, go ahead and add a small amount of pH up. Similarly, if your pH is too high, add some pH down.
- You do not want to keep adding a solution, though, as it changes the volume of your water. So just add a little bit and remeasure, so you do not keep overshooting 6.0.
- As always, stir well after every addition to the water.
Once you have the water solution set at a nice, even 6.0 pH, you are just about done preparing the water.
Adding an Air Stone
Leaving that water sitting still for days on end can naturally lead to contamination. Think about what happens to a small pond not fed by streams. Remaining perfectly still for too long causes algae and other contaminates to let loose. Those water fountains are not just for show: they keep the water moving.
In your hydroponic tub, you also need to keep the water moving a bit to keep contaminates from gaining a foothold. A healthy environment keeps your microgreens healthy. An easy answer here is to buy an air stone.
To install, take out the:
- Airstone
- Tubing
- Air pump
That we described earlier, cut a small hole in the lid or the top of the tub, just large enough to run your tubing through. Thread the tubing through the hole. Now connect one end to the stone and the other to the air pump.
Rest the stone in the water, dangling low enough that it does not become caught on the microgreen cups but high enough so that it does not just lay flat on the bottom of the tub. If you have multiple tubs, many air pumps allow you to connect up to 4 tubes.
Switch the pump on. You will see the air stone create bubbles. All this does is insert air into the water, which in turn keeps it moving and cycling through bad particles.
Setting Up the Cups
You are almost there! You have the hard part done: setting up the hydroponic system. But you need stuff to grow, so let's set up our seeds. To do this, you will first need a growing medium. Since we are not using soil, you can buy one that is cheap and mailable like this Terrafibre one.
Cut the material in circles flat enough to fit on the bottom of your growing cups, allowing most gaps on the side to be open. Dip the cut pieces in the water solution just enough so they are damp but not soaked. Place them in the cups, and then put the cups in the tub lid holes.
Now you just need to pour in the seeds. Like the soil process, spread out the seeds on the cup bottom, so there are plenty, but with some minimal gaps in between for spacing. Now that your seeds are placed in this environment, they will:
- Have room to grow upwards.
- Be able to spread their roots through the material and the cup, with space to grow down and touch the water's surface. It can be separated by the variety in organized cups.
If you have not done so already, place your cups in the tub lid, and you are ready to roll. Just mist them a little bit if they seem dry.
Continue on With the Process
Since this is technically already a stressful environment for your microgreens, you do not really need to worry about covering them now. But you can still do it for a day or two if you prefer.
The rest of the hydroponic microgreen growing process is pretty much the same as the soil method. The next steps you will be familiar with by this point:
- Sunlight or growing lamp
- Wait
- Harvest
To know how these steps work, you can essentially just follow the description above in the soil method. However, there are a few important notes to consider. For one thing, growing lamps get quite hot, so keep them a considerable distance from the hydroponic setup.
Close enough to do its job, but not too close where the plastic tub can become overheated. This could harm the microgreens, which need to be between 65 and 75 degrees Fahrenheit during growth.
Using a completely different method may affect time to maturity, as one might expect. Again, while this really depends on the specific crop, one can expect an average time savings of at least a couple of days.
As always, be careful during harvesting. This is a little trickier than soil since the roots might be wrapped around the bottom of the cup. To remove the microgreens properly, remove the cups from the tub lid. Pull slowly. If you feel the microgreen roots getting caught on the cup, stop. Feed the roots from the other side up and through until the plant is loose.
One final note on hydroponic microgreen growing: clean them before eating. You should do this regardless of the growth method. However, with the use of chemicals in the water, cleaning is especially important here.
Sources:
- True Leaf Market
- Grass and Garden TV (Part 1)
- Grass and Garden TV (Part 2)
Other Methods to Grow Your Microgreens
If you just got done reading about the soil and hydroponic growing methods and you do not really care for either of them, that is okay. There are a few other methods to grow microgreens than those two, although they have their own set of possibilities and challenges. They mainly include:
- Mats by themselves
- Aeroponics
- Nutrient Film Technique
Mats
Technically, growing mats can do the job on their own: no need for soil or a hydroponic set up at all. Cut them to the size you need and stack multiple layers so your roots, although short, have the space they need. Make sure you mist the seeds often to keep them healthy.
One thing to note if only use mats, though, is that the growth process will take longer. Why? Fewer nutrients. That also means your risk of a failed harvest goes up significantly. Some microgreens are heartier than others; consult the seed instructions before you begin.
Aeroponics
Aeroponics is the microgreen growing method where you place your seeds in, well, pretty much nothing. The idea here is to just keep them covered and away from everything except moderate temperature air, and they will grow faster. This technically works, but you may not find it worth the trouble.
If you do proceed with aeroponics, remember that nothing grows in a vacuum. You still need to spray it with water every day. You will also need to mist it with nutrients or fertilizer to keep it vibrant and growing healthy.
Nutrient Film Technique
Another microgreen method that is relatively new and gaining traction is the Nutrient Film Technique or NFT. This is essentially a hydroponic method that streamlines the process and allows for less work to be done upfront. You are going to need a longer tray and a little technical know-how, however, so only do this if you plan on growing quite often.
Here is how it works in general:
- Microgreen seeds in cups are placed in a long tray instead of a cup. The tray contains a similar water solution.
- A reservoir of nutrients sits away from the tray. A pump gradually sends the nutrients through the tray throughout the process.
- Nutrients are returned into a separate tub with an air stone and air pump.
- Nutrients are shaken up and therefore cleaned.
- Cleaned nutrients are placed into the reservoir and then back up into the tray to repeat the cycle.
This setup will end up taking a bunch more space compared to the regular hydroponic method, especially if you use something like an old rain gutter as your main tray. Putting that and the tub next to each other is fine. However, if you are able to place the tray over the tub in a hanging fashion, you can use gravity and not have to overdo it with all the pumps.
Sources:
Recap
So, as you can see, the decision to pick a microgreen growing method is a bit more nuanced, as you might think. If you are just starting out, though, good old tried and true soil is certainly your best bet, as it is easy to find and a natural process to understand.
But when you get comfortable, give hydroponics or even one of the other methods a try. You will come to enjoy the savings on things like soil itself and growing mixtures.