Indoor plants add a stunning touch of greenery to your indoor space and undeniably bring your home to life. With studies proving that indoor plants help to reduce your stress, boost concentration and creativity, while literally purifying your air and removing pollutants, these gems are honestly the cheapest therapy I’ve ever heard of. Keeping them clean is more difficult than one may assume, so where do you begin?
How to clean indoor plant leaves as a step-by-step guide will include:
- Understanding how to remove bugs from your plants before bringing them indoors
- Clean the leaves by:
- Wiping
- Dipping in pool of water (fresh)
- Placing in the shower
- Feather dusting
- Using a paintbrush or toothbrush if you’re indoor plant leaves are fuzzy
- Compressed air
- Or whatever cleaning method best suits your plant species
- Once cleaned, you’ll want to trim your plant of any browning leaves that may inhibit growth.
- Lastly, make sure the pot is thoroughly cleaned and plants ready to continue flourishing!
Methods will vary in slight degrees depending on the species of indoor plant you are nurturing, type of soil, size of the plants, and how naturally dirty they are.
This guide will be the only reading material you’ll need for all of your current and future indoor plant needs. We will cover what your indoor plants do for you, why it’s necessary to clean your plants in the first place, the steps needed for proper care, as well as tips to keep your plants looking their best. If you’re not a naturally green-thumbed gardener, stick with me for this breezy read and you might even consider growing your own food next!
How to Clean Indoor Plant Leaves: A Step-By-Step Guide
You’re not alone in your love of this lush ivy beauts! With 50% of homeowners investing in plants to purify your air, the trend is catching on, and this is actually a good one we can all get behind!
It’s up to you the amount of time and energy you’d like to commit to your plants, but taking the best care of them will save you from having to repurchase new plants later (which gets rapidly expensive!), while protecting your indoor air quality, and allowing you to feel the glorious pride of possessing a green thumb!
Once you get the hang of this process, keeping your indoor plants clean and thriving will be a cake walk. I wish there was a plant walk pun I could make here, but you get this idea.
Plants will sterilize your space, and different species will be known for different qualities. Before diving into the step by step guide, I’ve like to recommend that you research your specific plant to know for certain that these cleaning methods apply, but this is why we’re covering a variety of methods that pertain to most any plant type.
Some of the amazing things your indoor plants may do for you include:
- Clearing your mind – Research has proven that plants will evoke positive emotions and reduce anxiety, depression, and tension reduce anxiety, depression, and tension when lived with for prolonged durations. The most calming plants for your home are:
- Lavender
- Jasmine
- Red-Edged Dracaena
- Reducing your body pain – Studies prove that certain plant types can reduce your headaches and fatigue by eliminating toxins from the air and purifying your space. This is why plants are being brought into hospitals more now as post-operative patients that keep plants by their bedside are reported to have 20-25% less body pain! The best plant species for this purpose are:
- Feverfew
- Croton (Codiaeum)
- Philodendron
- Help you sleep better – Waking up rested is a topic that you can find extensive research on, including how it will aid in your aging process and lower your risk for dangerous illness and disease. Our bodies need rest and quality rest at that. So if you’re interested in indoor plants, why not opt for one that will aid your rest? The best purchases to make for this purpose will be:
- Pineapple Plants
- Gardenias
- Snake Plant
- Reducing pollutants – It may seem odd that pollutants are inside your home as well as outside, but that same air seeps in, and without your purification, you could be breathing in more city debris than you realize. NASA’s Research reveals that 87% of air toxins are removed by houseplants within 24 hours! If that’s not incentive to keep your houseplants clean and thriving, I don’t know what is. The best anti-pollutants and air purification plant breeds are:
- Boston Fern
- Devil’s Ivy
- Peace Lily
These are just a few reasons to keep your houseplants flourishing which will ultimately mean keeping them clean. If I’ve sufficiently sold you on the magic of indoor plants, let’s explore why it’s important to keep them clean before the very simple processes.
Why Do I Need to Clean My Indoor Plants?
The main functions of a plant are to produce oxygen through photosynthesis, exchange that gas to the atmosphere, and then evaporate that hydrogen through transpiration.
When your plant is covered in dust, none of these things can happen.
The stomata is the part of the plant which opens to absorb the sunlight and nutrients. If dirt or dust is collected here, it will hinder gas exchange and ultimately result in a dead houseplant.
If you’re neglecting to dust and nurture your plant, they won’t be able to properly feed themselves or remain healthy. This can lead to a diseased plants, expensive replacements, and even pest infestations. Pests can target already weakened plants because they can sense their quality of being an easy target.
Don’t allow your plant-babies to fall prey to nasty and creepy crawlers just because you were lazy and didn’t want to dust. It’s perhaps the easiest chore you may have, so take it seriously if you want an anti-bug as well as clean-aired home.
Now for the step by step plant cleaning guide!
Step #1 – Remove Bugs Before Bringing Indoors
You may not realize when you purchase your plants from the store that they are often crawling with pests. You can check them at the store (and let the salesperson know if you see one completely covered in bugs to save the next consumer from bringing that one home), but sometimes you won’t be able to see them.
Certain types of these pests are not visible to the eye at first glance and are very small or buried deep in the soil. They could still be there even if you don’t want to believe that, and I personally find this step to be the most important of the entire guide. I don’t want bugs in my house, and I’m assuming that’s not your intention in purchasing plants either.
The most common indoor plant pests are:
- Thrips
- Whiteflies
- Mealybugs
- Fungus Gnats
- Spider Mites
- Aphids
- Scales
- Springtails
My skin is crawling just typing that list, so how can a plant-lover indulge in their green-thumbery without these nasty side effects?
The process will go as follows:
- Look for the tell-tail signs of
- Holes in your leaves
- Crusty bumps or brown spots
- White fluffy bits on the stem (be sure to check under the leaves as well because many pest species hide where they are least exposed to sunlight)
- Actual bugs that are visible like aphids and mealybugs
- Isolate the plant and be sure you haven’t brought it inside yet. Doing so will mean the pests can hop from plant to plant and soon enough your whole house is infested. Take steps to do this outside before ever exposing the new plant to your home.
- Grab the following supplies:
- Large bucket
- Mild and non-toxic soap
- Kitchen strainer
- Spray bottle
- Scrub brush
- Neem oil
- Old towels you don’t love too much
- Put a ratio of about 2-5 tablespoons of the mild soap (be sure your plant is not overly sensitive to this, but most will be fine). The ratio of soap to water will depend on how soapy you want it to be, but the soap is what will kill the bugs, so be sure it’s strong enough for this. I recommend 1sp per liter. You can also purchase insecticidal soap as well.
- Put the entire plant, pot and all in the soapy water bucket.
- Allow it to soak for 15-20 minutes.
- If any leaves stick out, clean them by hand with a cloth and the soapy concoction.
- You’ll notice the bugs will float to the top of the water. Remove the floating pieces before removing your plant. This is where the strainer can make things simpler.
- Now pick your plant out of its pot and scrub the pot. Get all the bugs and nastiness off the inside of the pot before putting your beloved plant back inside of it.
- Give it a final rinse off with the hose and allow water to drain and dry before moving inside.
- The last step will be to spray periodically with Neem oil. This is a pest preventative and can help protect your plant from unwanted friends. Certain plants are more sensitive than others to Neem oil, so I recommend testing a leaf or two before spraying the entire plant.
Note – If your plant is too large for any bucket, this is where the spray bottle can also be useful to do the entire method without the bucket. Simply spray on the soapy concoction on the leaves, leave for the same 15-20 minutes, clean out pot, and neem oil that babe! Be sure to get the stem too and replicate as closely as possible what the process would look like if you could soak it from pests.
Now you can rest easy when shopping for plants that you’re not bringing a pest exhibit into your sanctuary.
This also applies to bringing your outdoor plants in for the winter and cleaning them before they may enter! (Pro-tip:Bring the outdoor plants in with this pest cleaning process about 2-3 weeks before the cold-front hits. This will prevent your plant from going into shock from the environmental change and hopefully preserve it in the climate change).
The next call of duty will be to maintain your indoor plant and keep it cleaned regularly once it’s living its best life inside of your home.
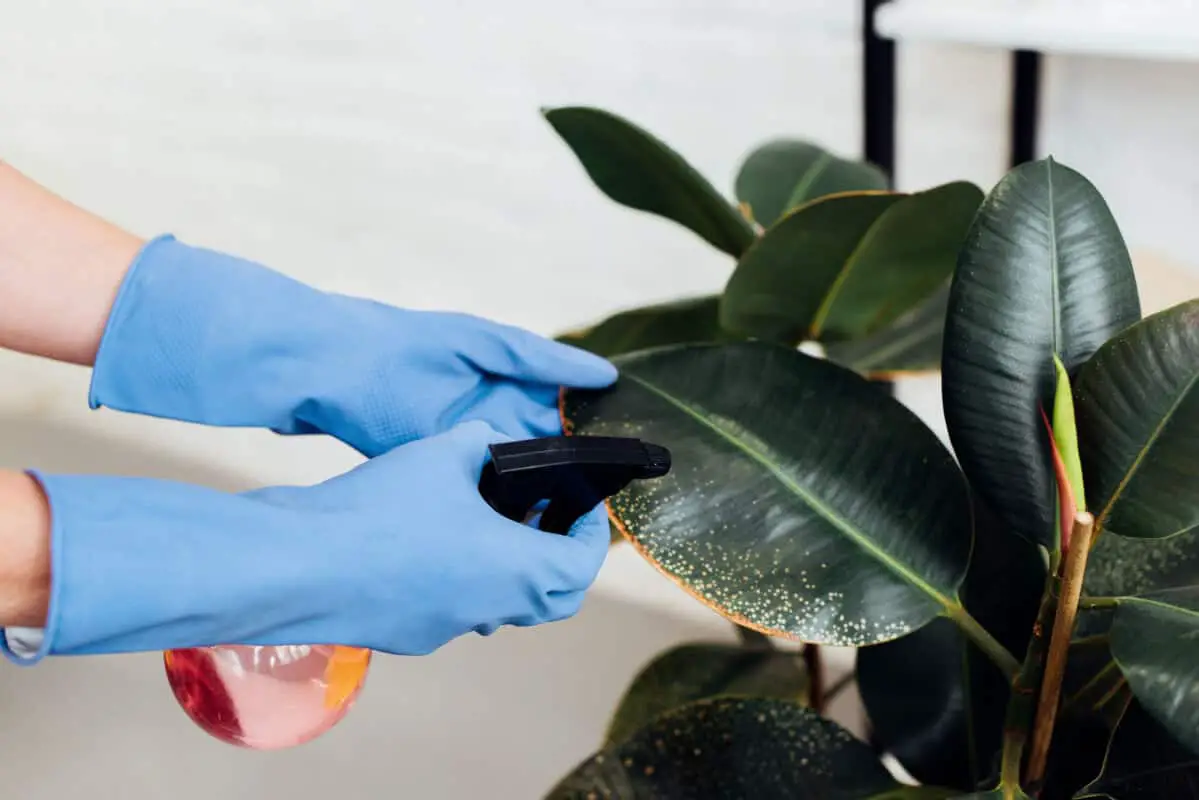
#2 Keeping the Leaves Clean
The first step was the hard one! So the rest will be a breeze. The frequency at which you will clean your plants will depend on the plant type, but you will usually need to dust them from around once a month to once a season. I recommend simply keeping an eye on your plant, and you will see if dirt/dust buildup is harming your plant’s quality of life.
If you experience dust allergies, you may want to dust them more frequently, and it should not harm the plant to do so.
Some of the best methods to clean your plant will include:
- Wiping it Down– Perhaps the simplest method of all is to take a slightly damp towel and wipe down your Mr. Plant. Reach under the leaves and get all the little nooks and crannies you can reach.
You can use a rag, hand-towel, microfiber, or paper towel, but just be sure that the material is soft enough to not scratch or tear your leaves. I sometimes use an old t-shirt and just dampen it with water. Dry off with a dry towel to prevent tiny water spots from appearing on your leaves post-cleaning.
If your plant has too many leaves to sit there all-day cleaning them one by one, try something more thorough such as the dip or shower method.
- Dipping in Pool of Fresh Water – This will be the dunking method which will clean your plants the fastest and most thoroughly. You’ll want to avoid using water that is very cold or very hot, which may be harmful to your plant and essentially freeze or bake it.
If you have a smaller plant, this is the perfect method for you because you can just dip it in tepid water. Use room-temperature water and flip your potted plant upside down while holding the soil inside of the pot. The last thing you want is the soil falling all over the place and being lost in the sink/tub of water (what a mess!).
Now simply move the plant gently through the water to give it a little swirl. This is to knock off any spider webs, dust, dirt, or pests. Flip it back and allow it to dry before putting it back in its home base. You can gently blot the leaves to prevent water spots, which may make you feel like you have to reclean the plant.
- Placing in the Shower – Another very simple method that works if you have a larger plant that can’t be flipped upside down easily is to place it in the shower. Use lukewarm water to spray the leaves and get off the grime.
You may also notice salt buildup on your plant, which looks like white buildup. This is from the soil and fertilizer you may be using (or pests! Google pictures for the difference). If it’s salt buildup, the shower technique will work most effectively and get that buildup removed quickly.
Again, dry in the method you most prefer, using a towel will eliminate the most water spots while air drying is easiest.
- Feather Dusting – If the layer of dust is small, don’t fret with big position shifts or dousing the plant. A simple feather duster should do the trick, especially on the larger and shinier leave varieties. It is recommended to use ostrich feathers as they trap dust very effectively.
Simply brush the duster over your leaves without being rough or knocking any steps too wildly. When finished, take the duster outside to shake that dirt out of your clean home! This is a great in-between method for the larger, more in-depth cleaning methods. Perhaps every 6 months, you can hard-core wipe the plant or dip it in water, but every month or so you can simply dust it. This will keep your plant healthy and give it the attention it needs to survive for years to come.
- Using a Brush – This will be your go-to technique if you have a fuzzy-leafed plant. Use a soft paintbrush or toothbrush if you’re indoor plant leaves are catching dust in all that fuzz. This is because some of these fuzzier breeds are like cactus’ and don’t need a lot of water. The water can actually be damaging to the leaf’s hairs if used in too high of a concentration.
Simply start from the base of each leaf to the tip and sweep away the dust. I like to brush from the top of the plant to the bottom so that the dust falls to the lower levels, which you will get last. Have a paper towel handy for dust collection and voila!
- Compressed Air – If you’ve got a cactus or type of plant which has a waxy coat on it to keep water inside, you obviously can’t wipe it down and may risk harming yourself or the plant by cleaning in the sink or shower. In this case, purchase a compressed air can as the safest method to de-dust these breeds. You’ll simply turn on the air can and blow the compressed air on the plant to dislodge the dirt.
Doing this outside may be optimal, so you’re not blowing dust around your home. Don’t spray too hard or too close if you notice it’s losing leaves or coming apart. Some plants are too sensitive for this method, and if you choose to do so, blow the air about 12 inches away from the plant to prevent harming it’s exterior tissue.
These are the best techniques to safely maintain your plant, so be sure to keep an intentional eye on your indoor plant to be sure you notice dust or dirt buildup.
#3 Trim the Leaves
Now you’ve debugged your plants, brought them to their new home, kept them dust free, and cleaned to maintain your home, and now Mr. Plant is due for a trim!
This is a quick and easy step I won’t spend much time on. The process will be that after you’ve tidied your plant will be to keep an eye out for any browning, yellowing, or dying leaves.
If you see a dead one, cut it!
They may even start to fall off on their own, so simply aid the plant by removing it. Don’t pull leaves that don’t want to come as it may rip the plant apart or prune parts. The pruning will risk drying out the inside of the plant and harming it in the long run.
Some leaves are going to brown and fall off, which is natural. Don’t worry too much about this, and keep a helpful hand around to pull off falling leaves for your indoor plant. This will keep it growing and thriving without any dead limbs weighing it down.
#4 Don’t Forget the Pot Maintenance
The final step to keeping your plants clean and dust-free will be to keep up with its pot. Just like you grow in your abode/home, the pot is your plant's home! Mr. Plant wants a clean pot to live in just as you would, so don’t forget about this step after all the hard work you’ve done to maintain it thus far.
Every few months to biannually, you’ll want to take your plant outside and remove it from its pot.
This is when you can use the same solution as before to thoroughly clean the pot with mild soap. Some recommend using bleach with a ratio of 1 to 10 parts water, but I find that to be a bit strong on your plant’s soil and nutrients.
Scrub the salt buildup from the soil and get that pot into shape! Periodically flushing the pot like this will prevent future buildup, which could inhibit your plant’s ability to absorb nutrients.
Replant your pot, and now you know you’re living with a fresh green friend and not a dirty, dusty, salty, pest-covered one!
These are the steps to keep your indoor houseplants growing for years to come, growing bigger, better, and more beautiful.
I realize all of these steps can sound like a lot of work, but I hope through reading it all, you realize why it is important. Imagine the peace of mind you’ll have along with the enhanced quality of your air.
Happy lungs, happy life!
Bonus Section! Plants that Repel Pests and Insects:
Because dust is not as large of an enemy to plants as pests are, I wanted to include some plants which can actually do the work for you and prevent pests on their own!
You’re already cleaning your plant and keeping your home safe, but why not add this second layer of defense against the arch-foes of your plant’s nutrients?
The way in which these indoor plant types work is by releasing a fragrance that bugs and pests find disgusting. It’s good news for us and can keep your plant from getting holes all over it or bugs hopping on to your pup, kitties, or you!
Some wonderful indoor plant options which naturally will repel pests are:
- Lavender – Everyone’s favorite calming scent and will naturally bring a relaxing energy to your home while aiding your sleep. Not only this, but bugs will be repelled from your home as well! Bugs hate this stuff, which is why you see it in natural bug sprays often. I recommend keeping some fresh lavender in your closets and drawers as they deter fleas, moths and even rodents.
- Lemongrass – Nature’s very own citronella! For obvious reasons, that’s why you’ll find lemongrass in insect repellent as well, but having the plant eliminates all of the chemicals in man-made sprays. Add the fresh fragrance to your home and keep it near doors and windows where creepy crawlers and flyers tend to sneak in.
- Basil – What I like about keeping basil in my kitchen is that this room is for cooking and therefore a space I truly don’t want bugs anywhere near. Basil in the kitchen will keep the yummy foods smelling less enticing to powerfully-nosed critters.
Added bonus, reaching right over to grab fresh basil from your indoor garden to throw in pizza, pasta, in your salad, or anything you can dream up! Very easy to grow and will combat things like houseflies and mosquitoes.
How incredible is mother nature to create plant breeds that will resist bugs and protect your home simultaneously?
Adding these stunning and calming weapons to your floral artillery belt will just keep your plants thriving even longer! With bug prevention and dust maintenance, the only thing you’ll have to worry about it watering the darn thing.