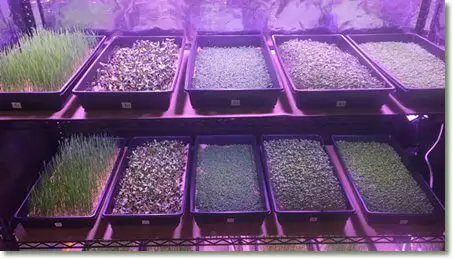
You’ve recently started an indoor garden, and you’d like to grow some microgreens. It’ll be so much more convenient to garnish your homemade dishes with fresh vegetable greens. The only issue is, you’re not sure what kind of light to use for your microgreens.
What is the best light for microgreens? The best light for microgreens is a T8 fluorescent light, with LEDs or T5 fluorescents a decent backup. You can also rely on natural sunlight when it’s more abundant, such as in the spring and summer.
In this article, we’ll talk in much more detail about your lighting options for growing microgreens and which lighting is best. We’ll also discuss lumens, how many hours of light your microgreens need a day, and what happens if they don’t get enough light. Keep reading, as you’re certainly not going to want to miss it.
What Is the Best Light for Microgreens?
As we established in the intro, if you must use a form of artificial light (i.e. that which does not come from the sun), then a T8 fluorescent bulb is your best bet. In this section, we will describe each type of light you could buy for your microgreens, from the most to the least recommended.
T8s and Other Fluorescents
Fluorescent lighting has long since been a favorite for indoor microgreen gardeners for a reason. When you turn your fluorescent light on, an electric current within triggers the mercury vapor. This results in light that’s ultraviolet. Photons within the light meet a phosphor coating, causing us to see beautiful, bright, clean fluorescent lighting.
Today’s fluorescent bulbs are good for upwards of 20,000 hours, making them quite a cost-effective choice. You also get great light intensity, and the bulbs throw less heat. They’re quite inexpensive as well, so even indoor gardeners on a budget can afford fluorescents.
Okay, so what’s a T8 fluorescent? It means the diameter of the fluorescent is an inch in size. This type of fluorescent light won’t buzz, as it has an electronic ballast over a magnetic one. It’s also a smaller light, as a T5 has a diameter of 1.5 inches. T5s can be somewhat costlier than T8s, but they don’t produce much different results for plants like microgreens. You’re much better off buying T8 fluorescents if you can.
Sunlight
You can’t go wrong with sunlight when tending to your microgreen garden. Sunlight is free, bright, and strong enough to help your microgreens become lush and full. That said, we put sunlight below fluorescents because sunlight is not as reliable.
As summer ends and fall begins, the days get shorter and your microgreens have less sunlight to rely on. The winter days are often very bleak and sunless, making it hard to grow a garden indoors. Even during the seasons in which the sun is out more, on cloudy, rainy days, your microgreens are once again left without the sun.
Also, if your microgreens need sun for more than eight hours (which some do) but sun is set for the day, you’re now in a pickle.
We’d recommend supplementing your microgreens with sunlight but turning on a T8 fluorescent grow light on cloudy days or at night.
LEDs
A light-emitting diode or LED light is another viable lighting solution for your microgreens. The light itself acts as a semiconductor. As current goes through the LED, the semiconductor’s electrons meet with electron holes. The holes let out light photons. However much energy the electrons need to reach the semiconductor will determine the color of your LED light. Yes, LEDs come in many colors, from white to blue, red, purple, orange, yellow, and green.
You’ll want to a choose an LED light color carefully for your microgreens. Ultraviolet light is too damaging, so avoid that. Violet and blue tones will lead to microgreens with a stronger smell and flavor, making them a great choice. Green LED light will produce more chlorophyll in your microgreens. Blue and red light can accelerate growth, but yellow slows it.
LED lights have a lifespan of up to 50,000 hours, so they rival fluorescents in terms of longevity. As you shop around though, you’ll find that LEDs tend to be costlier, and raising the temperature of your environment can cause the LEDs to burn out faster, which is another problem.
Compact Fluorescent Lights (CFLs)
Your next lighting option for microgreens is the CFL, or compact fluorescent light. These lights go by other names, like compact fluorescent tubes due to their shape and size. As an incandescent bulb replacement, CFLs include an electronic ballast and a folded, curved light tube within.
Like a standard fluorescent light, a CFL has electrons that attach to mercury atoms. When they get warm, the electrons release ultraviolet light. This becomes visible light when it hits a fluorescent coating.
You can cut your electric power usage by 1/3rd to 1/5th by switching from incandescent lights to CFLs instead. CFLs also have a much longer lifespan of at least 15x that of an incandescent bulb. You will spend more money on a CFL than an incandescent bulb, which is the tradeoff.
Incandescent Bulbs
Some beginner microgreen gardeners may use incandescent bulbs, but this is the option we recommend least.
If you have old lightbulbs in your home, then surely you’ve seen an incandescent light before. It stands out because it has a filament made of wire inside. When electric current strikes the filament, it becomes hot and begins emitting light.
You do get a pretty good light spectrum with incandescents, but with their ultraviolet or infrared emission, you lose a lot of efficiency. Incandescent lights will also get very hot, but not super bright. You’ll get about three months out of an average incandescent bulb, so it’s not a cost-effective choice for your indoor garden.
How Many Lumens for Microgreens?
Based on the above information, you’ve chosen which light you want to use to grow your microgreens. Before you start shopping, you want to make sure your indoor garden receives the appropriate number of lumens.
In case you’re not familiar, lumens are luminous flux units as part of the International System of Units. If the light you get is the same as a light from a candela sending out light in every direction from one angle, then that’s a single lumen.
Still confused? That’s okay. In layman’s term, a lumen is how bright your light source is, whereas the watts are about how much energy the light source uses.
So, for an incandescent bulb that’s 100 watts, it’s also 1,600 lumens. An equivalent CFL would be 26 watts and an equivalent LED would be 22 watts. If you have a 40-watt incandescent bulb, which is the equivalent of 11 watts for CFLs and nine watts for LEDs, that’s 450 lumens.
Now that you understand more about lumens, how many do you need to illuminate your microgreen garden? You want either T8 or T5 fluorescents with 1,700 to 2,000 lumens. Depending on the size of your indoor microgreen garden, this lumen number may be higher or lower.
What Is the Best Color Temperature for Microgreens?
You still don’t want to buy your grow lights for your microgreens quite yet. You know how many lumens your indoor garden needs, sure, but what about the color temperature?
Wait, what is this? Color temperature, also known as light temperature, is a measurement in Kelvin that may be as low as 1,000 and as high as 10,000. Knowing the color or light temperature tells you what your light looks like emitting from the bulb.
Bulbs have a correlated color temperature or CCT that determines the light’s color temperature. Based on the Kelvin temperature, the CCT can change, typically from blue to yellow to orange or vice-versa.
You’d represent color temperature as such: 1,000K, with the K standing for Kelvin in this case.
A color temperature of 2,000K to 3,000K is considered a warm white. Increasing the color temperature to 3,100K all the way to 4,500K produces a cool white hue. Light at a color temperature of 4,600K to 6,500K is considered a daylight color that’s bluer than white.
If you’re using a fluorescent light to grow your microgreens, its CCT should be 4,000K to 6,500K. T8s tend to have a color temperature of up to 6,500K as well, so sticking within that range should be fine for your microgreens.
How Many Hours of Light Do Microgreens Need?
Okay, now you have all the information you need for your microgreen lights, so you’re free to shop at your favorite store or online.
When you finally get your lights, you excitedly screw them on, plug them in, and turn them on. Should you leave the lights on all day and night? Or only during the night and not during the day or even vice-versa?
Almost no microgreen needs 24/7 light, as that’s a touch excessive. Of course, some types of microgreens do require more light than others. As a general rule, it’s ideal if your growing greens can get at least four hours of sunlight daily and preferably more like eight hours.
If you have only shaded sunlight to provide, then give your microgreens six to 10 hours of exposure to this less strong sunlight.
Are you only using artificial light sources because the sun is barely out? For a T8 fluorescent, our recommended pick, about 12 to 18 hours of light per week, not per day, has produced good results for many an indoor microgreen gardener.
If you’re looking for more specific guidance, here is a list of some of the most popular microgreens and their lighting requirements:
- Endive – Partial shade or full sun
- Celery – Full sunlight
- Mint – Full sun or partial shade
- Alfalfa – Full sun
- Basil – Full sun, six to eight hours every day
- Marigold – Full sun
- Mustard – Partial shade or full sun
- Lettuce – Full sun, 10 to 12 hours every day
- Carrot – Full sun, six to eight hours every day
- Wasabi – Varies; low-intensity light in 20+ hour bursts are good for photosynthesizing wasabi plants
- Radish – Full sun, six hours every day
- Fennel – Full sun
- Wheatgrass – Indirect light to full sun
- Kale – Full sun, six hours or more
- Cabbage – Full sun, six hours every day
- Parsley – Full sun, five hours every day
- Chives – Full sun, with other conditions acceptable
How Do You Know Your Microgreens Are Getting Enough Light?
Let’s say you’ve had your microgreen garden for a while when you stumble upon this article. You realize through reading that you’ve made some mistakes growing your microgreens.
That’s more than okay, especially if you’re a beginner! Mistakes happen to us all. If you can rectify what your issues are and then improve upon them the next time you grow microgreens, then you can treat the mistake as a good learning opportunity.
One such learning opportunity is how much light your microgreens need. You can typically tell when your plants are lacking in light and if they’re getting too much. Here are the symptoms to look out for in both situations.
Microgreens Lack Light
Leaving your microgreens on a windowsill on a cloudy day or forgetting to turn on their fluorescent lights can eventually cause the growing plant to weaken. Compared to a healthy microgreen, you may notice yours is considerably paler.
Your garden could also produce leggier plants. This isn’t a cutesy term, but a real affliction in microgreens and other houseplants. When microgreens become leggy, it means the seedling’s stem or internode has thinned out and become unnecessarily lengthy.
Your microgreen heads may be loose and difficult to tame. Well, if you can grow your greens at all, as they’re notoriously hard to grow when they’re leggy. You can also break the greens very easily if you touch them, making transporting them to a new pot or container difficult.
Some microgreens, such as kale, don’t react to a lack of light very badly. You can still eat this kale, but it tends to lack the leafiness and stockiness of healthier kale that receives plenty of light. Other greens aren’t quite as forgiving.
Microgreens Are Getting Too Much Light
What if you never turn the artificial light off? Some indoor gardeners may give their microgreens 24 hours of light, but that doesn’t necessarily mean you should. When you first grow your microgreen seedlings, they’re supposed to have blackout time.
You either want to put the seedlings in a dark environment or cover them. This encourages seedling stretching so your microgreens are nice and tender, skinny, and long. Long in this case does not mean leggy, by the way.
If your microgreens are in the germination phase, then they need to be blacked out for three to five days. Then, when they’re reintroduced into the light, they’ll begin photosynthesis.
You don’t have to give your growing microgreens another blackout period once they’re out of the seedling stage, but you do want to monitor their light intake. Like too little light is a problem, so too is saturating your microgreens in too much light.
This tends to happen more with sunlight than artificial light, but your microgreens could begin burning. The heat can also cause them to wilt.
We’d suggest going over to check on your microgreens every few hours and gently touching the plant. If it feels hot to the touch, it’s time to take a break from the sun.
Conclusion
Microgreens do best with fluorescent lighting, especially T8 lights, at 1,700 to 2,000 lumens and 4,000K to 6,500K, which is their color or light temperature.
Besides fluorescents, you can also safely use sunlight and LEDs for illuminating your microgreens. Remember not to provide too little light, but don’t turn your grow light on and then leave all day, either. Microgreens that get too much light can burn and wilt, both of which can impact their growth.
Now that you know more about the lighting requirements for microgreens, you can begin enjoying your healthiest, fullest greens yet!