You love the idea of a microgreens garden, as it’s small and tidy enough that even in your office or apartment you can have vegetable greens. Yet the thought of working with soil isn’t as appealing since it’s so messy. Is there any way you can grow microgreens without soil? If so, how?
Here are some growing mediums you can use for your microgreens instead of soil:
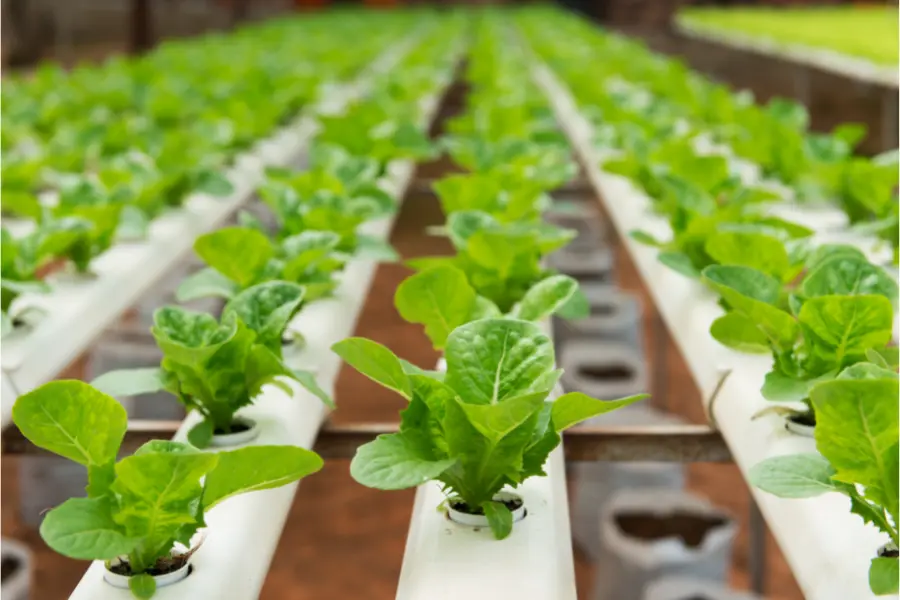
- Hydroponics
- Coconut coir
- Jute fiber pad
- Perlite
- Vermiculite
- Peat
As you can see, you have lots of methods for growing microgreens without even a single dash of soil. Ahead, we’ll discuss each growing medium in more detail so you can determine which is the most suitable for your starter indoor garden. You’re not going to want to miss it!
No Soil? No Problem! Grow Microgreens Without Soil Using These 6 Methods
Hydroponics
If you have even a passing interest in indoor gardening, then surely you’ve heard of the concept of hydroponics. This fun means of gardening involves you growing plants such as microgreens without any soil, which is exactly what you’re looking for.
Instead, a combination of aqueous solvent and mineral nutrients encourages growth in your microgreens. What does that mean? An aqueous solvent is just water. As for the mineral nutrients, these may include duck manure or fish excrement as well as chemical fertilizers.
From lettuce to strawberries, cucumbers, peppers, and tomatoes, these vegetables and fruits grow most commonly through hydroponics. Those aren’t your only options, though. The following microgreens will all thrive in a hydroponic garden:
- Radishes
- Alfalfa
- Kale
- Collards
- Clovers
- Kohlrabi
So how do you get started growing your microgreens hydroponically? We’d recommend looking into a hydroponic kit, as it should come with everything you need.
This Handy Pantry hydroponic microgreens growing kit on Amazon includes six growing trays, three with no holes, and three with holes. You also get instructions (laminated), a spray bottle, a pH test strip kit, and grow pads. You’ll even find a variety of seeds you can use, including those for purple kohlrabi, red acre cabbage, Sango radish, spicy salad mix, and basic salad mix.
We recommend purchasing grow lights, typically T5 or T8 fluorescents, with the former more preferable over the latter. Your pH kit will tell you how acidic or basic your water is, which is very important. Microgreens require a specific pH range for successful growth. This is often between 5.5 and 6.5, but not exclusively.
Before you add your seeds, you want to test your water. If the pH is too low, then try mixing in some lime or wood ash to raise it. Should your water pH be too high, phosphoric acid can bring it closer to neutral.
Try to use rainwater or distilled water over tap water, even filtered tap water. If you can’t collect rainwater or find any distilled water near you, then boil the tap water or give it 24 hours on your counter or another room temperature environment. This will remove any chlorine in the water that can affect your water’s pH.
Next, put your seeds in the grow tray. Fill the spray bottle with water, spritz your seeds (don’t soak them), and then put a cover over them. The cover should be somewhat lightproof, such as a tea towel or a plastic lid. On a 12-hour basis, mist your microgreens, but otherwise, resist the urge to check on them. They need this time in the dark for germination to occur.
Five days after you begin, you should see the microgreens beginning to sprout. Now you can take the cover off and introduce fluorescent lighting. Also, feed the growing microgreens water from a container instead of misting them with a spray bottle.
If you continue the proper care, then within about 12 days, maybe even sooner, you can harvest your hydroponically-grown microgreens!
Coconut Coir
Since you’re not using soil as a base for your microgreens to grow, you need to replace that soil with something. Coconut coir is one of many growing mediums you can use, but what exactly is it?
Coconut coir, also known as coconut fiber, comes from the coconut’s husk or its shell. Besides its use in gardening, coconut coir is also favored for producing mattresses, brushes, doormats, and floormats. That’s right, if you walk onto your doorstep right now, you probably have a doormat that’s made at least partially with coconut coir. You’ll know because the mat has a rough texture.
Coir can come from unripe or ripened coconuts. If it’s the latter, then the coir will be noticeably browner. Ripe coir goes into the production of sacks and padding for upholstery. Unripe coconut coir is white, which is why this coir is nicknamed white coir. It’s used for manufacturing fishing nets, rope, string, and brushes with a light, fine texture.
One of the cool things about coconut coir is you can’t sink it, so a coir growing mat works well as part of your hydroponic garden for microgreens. Most commercially-produced coconut coir for indoor gardens comes loose in a bag or packaged into a brick. You can also find coir as a potting blend, but since you want to go soilless, this doesn’t apply.
When manufacturing coconut coir for gardening, first, the coconut shell gets removed. To keep as much of the shell intact as possible, the coconut is soaked until the shell loosens up. Next, the manufacturers take off the shell, drain it, and let it dry, which can take upwards of a year in some instances.
The coir is next shaped into bales or bricks, then cut into more manageable chunks such as croutons or chips. No, not the food, but smaller shapes.
So why use coconut coir for your microgreens garden? It has a soil-like feel but isn’t nearly as messy. You can apply water directly to the coir like you would with soil. The coir will hold a lot of water, 10x its own weight, so you never have to worry about underwatering issues with your microgreens. Also, insects hate coconut coir, mostly the feel of it, so your microgreens will be pest-free.
Coconut coir doesn’t include any nutrients, so make sure you feed your growing microgreens nutrient-infused water so they get what they need for growth.
Jute Fiber Pad
If you can’t find any coconut coir in your neck of the woods, you can also always use a jute fiber pad. Jute is a lot like coconut, so it’s a suitable growth medium for a soilless microgreens garden.
What is jute? This bast fiber comes from dicotyledonous plants, or dicots. Dicots include the jackfruit, lemon, coriander, eggplant, chickpea, mustard, apple, and mango plants among many others. A bast fiber is from bast, which is the skin or inner bark of a dicot plant.
Very specific growing conditions are required of dicots to produce usable jute. The plant must have standing water and alluvial soil, or soil that is unconsolidated and loose. The plant also needs a temperature range of 68 to 104 degrees Fahrenheit with a relative humidity of up to 80 percent. Monsoon season makes for the perfect time for harvesting jute, as up to 3 inches of rainfall must occur, but with soft and not hard water.
When the jute fibers get scraped from the trees, they’re then twisted into threads that are coarse in texture. The dicots listed above were for example only, as Tiliaceae family trees like the Corchorus genus produce the most hemp.
As a natural source of fiber, hemp is very affordable, with cotton the only more affordable fiber of its type. Jute leaves are full of minerals and nutrients at that growing stage, including folate, niacin, riboflavin, thiamine, protein, iron, and vitamins E, C, and A. How much of those nutrients make it through to the production stage of jute isn’t as clear.
You’ll find jute for microgreens gardens primarily in pad form. You simply lay down the pad in your growing tray, plant your seeds atop it, and then water the jute. Like coconut coir, jute has great water retention so you don’t have to water your microgreens quite as often.
When you’re done with the jute pads, you can always compost them or recycle them.
Perlite
Another growth medium you can use for a soilless microgreens garden is perlite. When obsidian hydrates, a volcanic glass forms that’s known as perlite. Its natural production makes perlite readily available. One of its top properties is that perlite can expand if it’s heated. Also, it can absorb a lot of water.
Of course, you won’t use perlite in its volcanic glass form for your microgreens garden. Instead, commercially-manufactured perlite gets put in a kiln. Since perlite expands when heated, this method is almost like popping popcorn. The result is something that’s akin to popcorn too. The perlite is a white, hard substance about the size of a popcorn kernel that can retain air as well as water. To reach this state, the perlite must be exposed to high temperatures, somewhere between 1,560 degrees to 1,650 degrees. Yes, we’re talking ridiculously hot temps here!
What happens in the kiln is the perlite’s water within will first vaporize and then leak out. Compared to the original size of the perlite, it’s now 7 to 16 times bigger in volume. The bubbles trapped in the perlite are reflective, hence why the perlite is white.
Perlite may contain calcium oxide at a rate of 0.5 percent to 1.5 percent, magnesium oxide at a rate of 0.2 percent to 0.7 percent, iron oxide at a rate of 0.5 percent to 2 percent, potassium oxide at a rate of 3 percent to 5 percent, aluminum oxide at a rate of 12 percent to 15 percent, and silicon dioxide at a rate of 70 percent to 75 percent.
Using perlite to grow microgreens without soil is quite beneficial for many reasons. Perlite is neutral on the pH scale, so it won’t make your water more acidic or alkaline. It’s also pretty cheap to obtain. Perlite will keep air moving in your microgreens garden by oxygenating the water.
Also, if your perlite is in good shape after you harvest your microgreens, you can typically use the perlite again no problem. That makes its inexpensive cost worth it, as you can hold onto the same perlite for a while.
Some plant species that are root-heavy can grow into the perlite, preventing it from working as well. You shouldn’t have that issue when growing microgreens though.
Vermiculite
Another good growing medium for your microgreens that’s soil-free is vermiculite. You can use vermiculite on its own or in tandem with perlite, whichever suits you best.
Vermiculite starts as a phyllosilicate mineral. Like perlite, vermiculite will become a lot bigger when it’s heated, which is why these two growing mediums go so well together. To produce vermiculite as most indoor gardeners know it, the mineral will undergo hydrothermal processes like alteration, or it will be weathered. In Brazil, China, South Africa, Russia, and the United States, vermiculite mines produce this mineral on a large scale.
Outside of gardening, vermiculite has a lot of uses. These include to produce embers in gas fireplaces, in AGA cookers, in commercial hand warmers, for in-ground swimming pools to make the base of the pool smooth, and as an ingredient in firestop mortar, some concrete compounds, and plaster.
To produce vermiculite for everyday use, it’s heated to extreme temperatures. The plates within the vermiculite make it open up, sort of like an accordion. Then, the water in the vermiculite becomes steam, opening the layers of the vermiculite even further.
Vermiculite will encourage your microgreens seeds to germinate without too much water. If you use just vermiculite in your indoor garden, you should wait until the true leaves of your microgreens sprout. Then, feed the seedlings fertilizer, but diluted so it’s weaker. Combine a gallon of water with a tablespoon of fertilizer to get the right mix.
Your soilless microgreens garden will benefit from having vermiculite as a growing medium due to the mineral’s great drainage capacity, its aeration abilities, and its water retention. It too has a neutral pH like perlite. Vermiculite won’t decompose either, so you can have it for a long time. The mineral also retains nutrients much like it does water.
You might have a tougher time tracking down vermiculite at your gardening supply store compared to coir or jute and even perlite, so shop online if you really want it. Do be aware that vermiculite is considered nonrenewable, so it’s not quite as good for our planet. Also, carbonate compounds used in microgreens gardens with vermiculite could lead to a chemical reaction that makes the water pH more alkaline. Test your water often.
Peat
The last growth medium for soilless microgreens we want to discuss is peat moss or Sphagnum. Peat belongs to a family of nearly 400 mosses. Although its pH is higher than other growth mediums, leaning more acidic, peat has awesome water retention abilities. Seriously, when growing in groups, peat moss can take over dry areas and store water amongst themselves to fill those spaces with more moisture.
On a cellular level, peat moss water retention is 16 times to 26 times the weight of the moss’ dry weight. Also, compared to most living organisms, peat moss doesn’t decay quickly, again due to its cellular structure. Within the cell walls are phenolic compounds that keep the peat moss alive longer.
Although peat is often used in soil, you can exchange the soil with coconut coir and still germinate your microgreens. Its sterile quality means the peat won’t introduce any diseases to your sensitive microgreens garden that could kill the seedlings early. Peat is also considered organic.
The porosity and absorbency of peat moss will always be its two greatest benefits.
However, compared to some other soilless growing mediums we’ve discussed for microgreens, peat moss does have some significant downsides. One of those is the acidity, which we mentioned before. You’d have to make sure your microgreens are more acidic. Otherwise, you can’t use peat moss.
Also, like coconut coir, peat moss has no nutrients, so again, you’d have to infuse your water with nutrients to nourish your microgreens. The biggest downside to using peat moss is the cost, as it’s quite pricy compared to the other options we’ve discussed.
Peat moss can also expire, so you can’t keep using it infinitely or nearly infinitely like you can with perlite and vermiculite.
Conclusion
If you’d rather skip the soil when starting your microgreens garden, you can, but you need another growing medium. Hydroponically growing microgreens is popular, especially when used with jute or coconut coir mats. You can also try vermiculite, perlite, or peat moss.
Best of luck with your soilless microgreens garden!