The toughest moment in any plant parent’s life is that dreaded first night away from your beloved plant baby. It’s tough enough as it is to regulate the amount of water your plants receive while you are present and able to respond at a moment’s notice. Going away on vacation and maintaining your plants seems inconceivable. However, it is also doable.
How can you water plants automatically while away? There are several DIY methods for watering your plants automatically while you are away from them. Any of these methods are effective for watering plants when you’re not at home:
- bottle method
- water wicking method
- bath method
- plastic greenhouse method
You can also purchase items like a watering globe or a drip irrigation system with a timer to automatically water your plants while you are away.
These methods are all fairly simple in theory, but in putting them to practice it helps to have a straightforward, precise guide. Read on to learn more about these automatic watering methods, how to apply these methods, and which method is best for your plant.
DIY Methods for Watering Indoor Plants Automatically
There are essentially four basic DIY methods for watering your plants automatically and they are all rooted, no pun intended, in farming techniques like drip irrigation or bottom watering.
These methods all can be employed by using materials you would commonly find laying around the house. However, they do require a level of resourcefulness, so be prepared to get crafty.
Bottle Method
With each of the bottle methods, the water will remain in the bottle as long as the soil is quenched, so your plants will receive water when they need it.
There are three versions of the bottle method:
Once the soil needs water, it will absorb the necessary amount of water from the bottle. Either method works, but a wine bottle will hold more water at a time and a water bottle will be easier to refill. This method will water your plants for roughly one week depending on the size of your bottle.
What to Know Before Watering with this Method
Both the water and wine bottle methods are fairly self-explanatory and require little maintenance other than refilling the bottle once the water has been depleted. However, some plant owners have experienced trouble with soil clogging up the holes in their bottle caps. In response to this, several modified versions of the bottle method have grown in popularity.
The best of these methods is the hanging bottle method. This method only requires one additional material, a string or wire that can be used as a hanger.
This method might not look pretty, but those who have put it to the test claim its effectiveness and durability surpass the original bottle method. Some have reported the hanging bottle method to operate consistently for nearly four weeks. This method allows for longer vacations and requires less frequent maintenance once you return.
How to Set it Up
- Water Bottle Method: To accomplish the water bottle method, you will first need a water bottle and a pair of scissors. Cut the bottom off of your water bottle so it is left open and then poke a hole in its cap. Flip the bottle upside down and stick it into the soil you wish to water. Then, fill it with water.
- Wine Bottle Method: For the wine bottle method, you will first need a wine bottle and a hammer and nails. Puncture a hole in the bottle’s cork or aluminum cap with the hammer and nails and then remove the cap or cork. Fill the bottle with water, then put the cap or cork back on and stick it into the soil.
- Hanging Bottle Method: First, cut out the base of the water bottle and flip it upside down. Then, cut holes on the sides of the bottle and wrap the string or wire through those holes. Find a place to put your plant so that you can hang this bottle on a structure no more than a foot over it. Then, fill the bottle with water and loosen the cap. Adjust the cap’s looseness to vary the rate of the water’s flow.
Water Wicking Method
This method is only as effective, in terms of its duration, as you construct it to be. If you have large enough containers, this method could water your plant for multiple weeks. If not, this method may only quench your plant’s thirst for a day.
You can place multiple ropes within the same container to water multiple plants, which makes this a perfect option for owners of multiple plants. This method will water your plants for roughly 1-3 weeks.
What to Know Before Watering with this Method
The size of your water container important, not to the operative success of the wick, but in the duration of its effectiveness. Be sure to use a container of comparable size to the size of the pot and relative to the amount of days you will be away. A large bowl is usually your best bet here.
For instance, if your pot is four inches in diameter and you will be away for about two weeks, then I recommend using a container that can hold half a liter of water.
Using a big enough container means you’ll need to account for space. Before you choose to go this route, make sure you have a spot in your home that will work. It should have the appropriate sunlight for the particular plant needing to be watered, and should be away from any extreme heat or cold.
How to Set it Up
Constructing a wick to water your plants is simple enough, but it is important that you follow each step precisely and fashion the wick out of an appropriate material. The best materials to use for the wick are synthetic fibers like nylon or acrylic yarn.
The water wicking method requires a cotton rope, often used as a clothesline, and a container for the water. The water flows through the wick through capillary action, a liquid’s ability to travel in narrow spaces without the assistance of gravity.
With all the supplies ready, all you have to do is fill the container with water and place it near the plants you wish to water. Once you have chosen a material for the wick, be sure to bury one end of the wick roughly three inches deep into the soil of your plant. This is easier to accomplish using a pencil or stick to push the wick into the soil.
Bath Method
This method only requires a bathtub or sink. For finnicky plants that don’t like being moved, this probably isn’t your best option.
For plants that do not require a lot of water, a saucepan is better suited. As long as the pot your plant is in has drainage, the water will soak in through drainage holes at the base of your potted plant.
The bath method is perfect for those without the aptitude for crafts or the necessary materials to build said crafts. As mentioned earlier, simply filling up your tub with a couple inches of water and placing your potted plant inside the tub will nourish your plant for about a week.
What to Know Before Watering with this Method
It is important to note that this method only works for potted plants with drainage holes built into the pot. Typically, you would find succulents planted in pots without drainage holes which works out as you would not want to employ the bath method for a succulent. This method would likely overwater your succulents and should mainly be used for more tropical plants.
In defense of the bath method, some plants react poorly to overhead watering, which makes bottom watering practices like the bath method more viable options. Plants like the African Violet in particular cannot be overhead watered as their leaves are very susceptible to leaf spot diseases.
If you are still worried about overwatering, you can also use a saucepan instead of a bathtub. However, this may reduce the duration of this method’s effectiveness, depending on the size of the plant and its daily water intake.
The bath method is an excellent option for plants that do not require direct sunlight, like tropical plants, while the saucepan method is for desert plants that require sun. This method will water your plants for about one week.
How to Set it Up
- Bath Method: Fill your bathtub or sink with several inches of water, three to five for most potted plants. You may want to lay a towel where you will be placing the plant to prevent it scraping up your bathtub or sink. Then, place the potted plant over the towel and leave it to soak until you return.
- Saucepan Method: This method is essentially the same as the bath method, but with less water. Simply fill a saucepan with a couple inches or less of water. Then, place your potted plant inside to soak in the water.
Plastic Greenhouse Method
The plastic greenhouse method requires four wooden stakes, a plastic bag relative to the size of your plant, and a little construction. As the water within the plant evaporates, the plastic bag will trap it and drip the water back into the plant’s soil.
What to Know Before Watering with this Method
The plastic greenhouse method is the toughest to pull off but also the one that reaps the biggest, or longest, reward. This method, when constructed and maintained appropriately, has a longevity of up to 6-8 months. However, the trick is constructing it.
The basic steps to constructing a plastic greenhouse are simple, place four wooden stakes around the plant and wrap a plastic bag or sheet around the plant. The nuance is in finding the perfect spot for your plastic greenhouse to live.
In direct sunlight, your plant will certainly overheat, so it is crucial that you keep your greenhouse in indirect sunlight. However, too little sunlight and the plant will not evaporate enough water to survive off of. The trick is to find that “goldilocks” amount of sunlight.
If you plan on being gone for a really long time, I recommend leaning toward too much sunlight as there are ways to counterbalance the excessive heat. If you are able to, stop by once a month to vent your greenhouse by lifting one side of the plastic bag up until the water droplets dissipate. You can also ask a neighbor to do this if you are unable to.
This method may have the greatest potential longevity, but its nuance and upkeep may limit the benefits of that potential longevity. If done right, your plastic greenhouse can keep plants watered for up to 8 months!
How to Set it Up
First, set up the wooden stakes so that they form an equidistant border around your plant. Then, water your plant as per usual and make sure to place it away from direct sunlight.
Then, wrap the plastic bag around the wooden stakes and over the plant so that the bag and leaves do not make contact.
Non-DIY Methods for Watering Indoor Plants Automatically
If you don’t trust your own craftiness or are on a time crunch, there are several tools you can purchase to achieve the same results as these DIY methods would.
- Watering Globes: These are essentially the store-bought version of the bottle method. Although they are a pricier substitute, watering globes will typically last longer than attempting to recreate their functionality with a bottle. Watering globes can last anywhere between 1-3 weeks, depending on size, and tend to cost around $10-20.
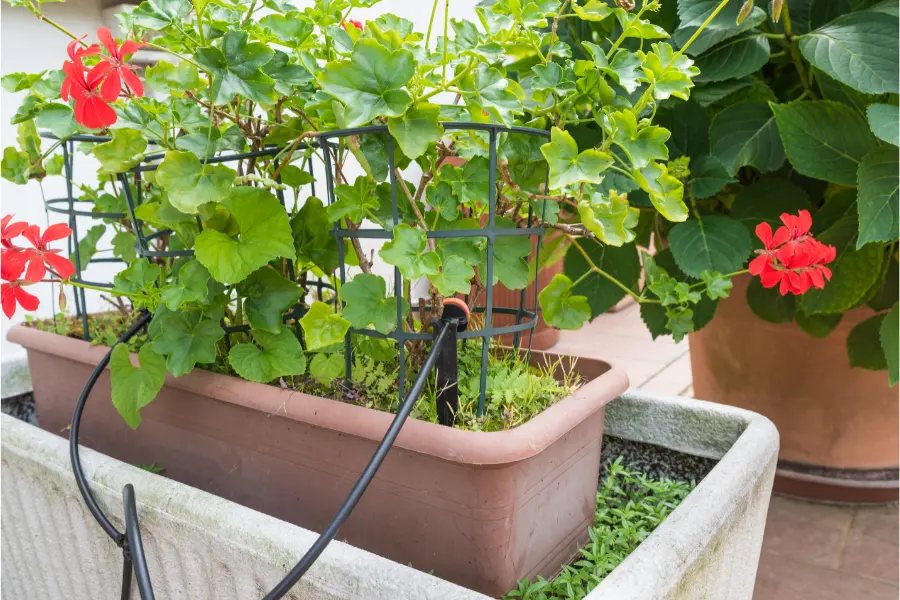
- Drip Irrigation System: A few of the methods listed above are predicated on drip irrigation. Thus, if you want to go the safe, albeit pricier, the route then you should invest in an automatic indoor drip irrigation system. Many of these systems have Wi-Fi with no distance restriction so you can control the system while you are away!
- Ask a Neighbor: Finally, not necessarily a tool, but it never hurts to ask a friend or neighbor to check in on your plants while you are away. As long as you trust said friend or neighbor, of course.
Methods for Watering a Garden Automatically
Sprinkler systems have become a staple of automatic garden watering in United States suburban culture. However, just because they are the most popular does not necessarily mean they are the most effective automatic garden watering system.
When you’re out of town or away from your home, your garden doesn’t have to depend solely upon Mother Nature to provide water.
Let’s investigate how you can keep your garden growing with any of these watering methods:
- Drip irrigation systems
- Sprinkler systems
- Soaker hose
Drip Irrigation Systems
Throughout this article, I have mentioned drip irrigation as it applies to the watering of potted plants. Drip irrigation works exceptionally well for individual plants, but there are also plenty of benefits to installing a drip irrigation system for your outdoor garden.
Drip irrigation systems are able to accomplish this feat by doing everything opposite to how a sprinkler system operates. First, drip irrigation prioritizes specific areas over broad water dispersion, delivering water directly to the soil around your plant’s roots if properly set up.
Benefits
The major benefit of using a drip irrigation system for your garden is its impact on your water bill. Let’s take a look at the rate of water usage for a drip irrigation system relative to that of a bubbler sprinkler system. Compared to a bubbler sprinkler system, which emits .5-2 gallons per minute, the average drip irrigation system stacks up well, emitting .5-4 gallons per hour.
Drip irrigation systems transport water slowly, minimizing the amount of water lost to evaporation or runoff. Sprinkler systems on average can waste anywhere between thirty and fifty percent of their water usage through evaporation and runoff. In comparison, drip irrigation systems are roughly ninety percent water efficient.
In addition, drip irrigation systems do not solely benefit your average water usage. By prioritizing specific areas and only providing the allotted daily water usage for each plant in your garden, drip irrigation mitigates the risk of weeds invading your garden. This also minimizes the outbreaks of fungi you may find in a garden using a sprinkler system.
Disadvantages
Although thus far drip irrigation systems stack up fairly well against sprinkler systems, drip irrigation does not come without a few disadvantages.
For one, drip irrigation systems require a lengthier and more expensive installation process than sprinkler systems, particularly if the garden you are watering is on the bigger side. Larger gardens may even require purchasing additional piping or installing a water pump to maintain water pressure throughout the entire system.
It can be difficult to regulate the water pressure in drip irrigation systems as you increase the amount of pipe. This becomes a real challenge if you have to bend and twist your pipe routes around obstructions in your garden.
Every bend in your pipe adjusts the pressure of the water flowing through your pipes. Therefore, be sure to account for these obstructions as you purchase additional piping or consider installing a water pump.
Furthermore, the pipes in drip irrigation systems tend to clog up. This isn’t necessarily a tough fix, but it defeats the purpose of installing an automatic watering system if you have to constantly check up on its functional efficacy.
Ultimately, drip irrigation systems provide a massive benefit in conserving your water usage and mitigating risks like weed invasions and fungal outbreaks. However, the lengthy installation process and upkeep are antithetical to the purpose of having an automatic watering system.
Sprinkler System
Benefits
The major benefits to a sprinkler system are the perfect foil to the major disadvantages of drip irrigation systems. Primarily, sprinkler systems are the most convenient automatic watering system for home gardeners who spend a lot of their time away from home.
Sprinkler systems do not require a lengthy installation process and can be timer set to run at specific times of the day, on specific days of the week. In fairness to drip irrigation systems, there are drip irrigation systems that you can set with timers as well.
A feature of sprinkler systems that drip irrigation systems cannot replicate is their ability to cover large areas. You will run into water pressure and overabundant piping issues when installing drip irrigation systems in larger areas. However, sprinkler systems are designed to cover large areas and you don’t need to install additional piping for them to do so.
Sprinkler systems also use buried water lines which, unlike drip irrigation systems, allows for lawn mower usage in the yard where the system is installed.
Disadvantages
Although sprinkler systems are an awfully tempting choice for the home gardener on-the-go, there are a number of disadvantages to sprinkler systems that may change your tune.
As mentioned in the preceding section, sprinkler systems waste much more water than drip irrigation systems do. I have also detailed the harm that sprinkler systems can cause for your garden in potential weed invasions and fungal outbreaks.
However, the benefits to sprinkler systems contain their own disadvantages as well. Sprinkler systems cover a much broader area and emit water at a much higher pressure than drip irrigation systems. With these benefits come the danger of harming nearby plants with too much built up water pressure creating a strong spray.
In addition, recent laws in California have popped up to restrict the amount of water pressure your sprinklers can contain. At the start of 2020, California implemented a restriction on water flow levels to 30 PSI (pounds per square inch).
This not only diminishes the effectiveness of sprinkler systems but signifies a greater movement away from sprinkler systems. If the law continues to reduce the power of sprinkler systems in an effort to save water, you might as well be using a drip irrigation system at that point.
Although drip irrigation systems may take longer to install, sprinkler systems are much harder to install. More precisely, sprinkler systems require additional planning before the installation process. Any mistake in the calibration for the location of each sprinkler head can cause damage to the surrounding area and force you to go through the installation process again.
Overall, sprinkler systems are an inferior automatic watering system when stacked up against drip irrigation systems.
Soaker Hose
If you still are not convinced you have found the right automatic watering system for your garden, there is a third option: The soaker hose.
Benefits
Of all three systems or methods for automatically watering your garden, soaker hoses are the easiest to install. All you need to do is hook up the hose to the nearest faucet and loop the hose around the plants you wish to water.
In addition, you will rarely run into any problems with maintaining a soaker hose. There are minimal clogging issues like there are with drip irrigation systems and the soaker hose is much more durable than a sprinkler head.
Finally, soaker hoses can also be run on timers, which make them a viable option for home gardeners who wish to get away from home every once and a while.
Disadvantages
The soaker hose is a simple, effective method for automatic garden watering, but it does come with its fair share of disadvantages.
For one, it is the least adjustable method for automatic watering. You cannot close off certain sections of a water hose like you can with drip irrigation systems, which only leads to further water waste.
Also, the amount of area a soaker hose can cover is surpassed by both sprinkler systems and drip irrigation systems alike.
Additionally, soaker hoses may be more durable than sprinkler systems in the short term, but in the long term they are very susceptible to weather damage.
Ultimately, soaker hoses are a simple option for first-time gardeners looking for a way to automatically water a small garden. However, for larger gardens, the real debate is between sprinkler systems and drip irrigation systems.
Essentially, you can compare sprinkler systems and drip irrigations systems like energy providers and installing your own solar panels. In the short term, it is easier and cheaper to stick with your energy provider. However, in the long term, those solar panels will save you money and prepare you for the energy landscape of our future.
In Conclusion
We have gone over a lot of information on plant watering in this article, so we are probably due for a brief refresher. Upon reading this article, you should understand the four DIY methods for automatically watering your indoor plants as well as the simpler methods for doing so.
You should also be an expert on automatic watering systems for outdoor gardens and yards, particularly the drip irrigation system, sprinkler system, and soaker hose. As a final thought, I will admit that watering plants is not as easy as it sounds. There will be trial and error with most of these methods and systems, but I implore you to keep at them until you get them right.

Subscribe To Our Newsletter
Join our mailing list to receive news and updates. Don't worry. We will not smap you ;)
You have Successfully Subscribed!